Plant Care: Know what your plants need
The success of a plant depends on proper installation and maintenance. Acceptable soil, sufficient water and adequate drainage are all necessary for plants to live. Some reading on modern planting techniques is recommended to help insure success.
Usually, plant mortality is due to lack of proper care after installation or poor site selection for a particular variety. Over or under watering for site conditions constitute approximately 70% of the plant mortality problems we see in landscape plants and 90% in house plants. Do not over-fertilize upon planting.
We will be glad to answer your gardening questions. Call the nursery if you have any questions about planting procedures.
Review our Plant Warranty.
Items requiring special care:
- Plants of a marginal nature in the area planted. There are five different climate zones and many microclimates in the Rogue Valley - ask us about yours.
- Items planted in containers, boxes or barrels
- Living Christmas Trees used indoors
- Bedding plants
- Novelty Plants
- Bulbs
- Daphne
- Redwood
- Noble Fir
- Items not immediately planted
- Transplanted items
Basic Rules
- DON'T CARRY B & B PLANTS BY THE TRUNK OR STEM ALONE, SUPPORT ROOT BALL
- DON'T PUT WEED BARRIER, BARK OR STONE MULCH WITHIN 6 INCHES OF PLANT TRUNK
- DON'T PLANT IN LOW SPOTS WHERE WATER COLLECTS (MOUND AREA).
- DON'T PULL LARGE TREES WITH A CHAIN/ROPE TIED AROUND TRUNK
- DON'T BURY GRAFT (IF PRESENT) OR TRUNK TOO DEEPLY.
- DON'T REMOVE BURLAP OR WIRE BASKETS FROM B & B.
- DON'T PLANT ROOT SYSTEM TOO DEEPLY.
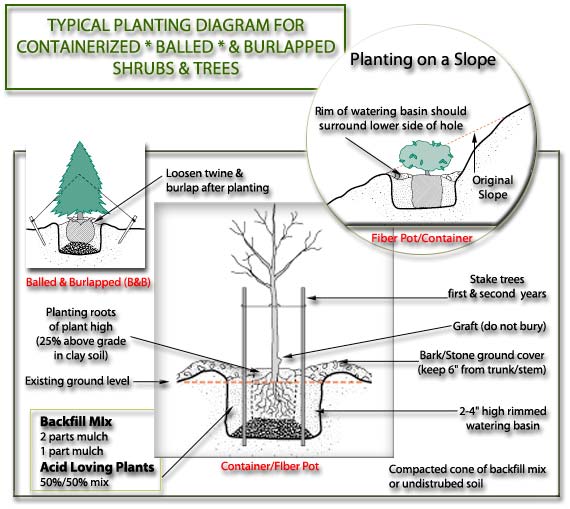
Containerized or Balled & Burlapped Trees and Shrubs
Pre-planting
Did you select a proper site for the requirements of the plant?
Never carry a B & B plant by the trunk alone, always support rootball.
Do not bury the graft (if present) or any part of the trunk --- Plant High!
Do not roughen root ball (untangle or cut roots) unless you have personal experience with this procedure; it can case great harm to the plant if done improperly. Call the Nursery if in doubt.
Containerized Plants: Watering a plant first will make it easier to get it out of the pot.
Balled & Burlapped: Do not remove burlap from rootball. Cut twine at the base of the truck after hole is half-way backfilled. Fold back or cut away top portion of burlap and finish backfilling. (Burlap decomposes in the soil.) Don't remove wire basket if present.
Optional: Add Root Master B1 that contains Naphtahalene Acetic Acid to the water to stimulate new growth.
Planting
- Dig a hole with the center slightly shallower than the height of the root system and at least twice as wide. This allows the bottom of the root mass to sit on undisturbed soil and for its top to be slightly higher than existing ground level (see illustration). The soil around the plant roots should be at least 1-2 inches higher than surrounding ground level and as much as 25% higher in clay soil to allow for improved root-zone drainage.
- Set plant in the hole. Backfill halfway with a mix of 2 parts soil native to the site to 1 part soil amendment mixed thoroughly together. Use our general purpose Black Forest™ Redwood Based Soil Conditioner. For a richer pre-fertilized soil conditioner use Crop™. For Rhododendrons, Azaleas, Camellias, Blueberry, etc. use a low pH product like our Acid Planting Mix™Do not use house-plant potting mix.
- Check again that the plant is sitting straight and slightly higher than ground level and that the trunk will not be buried. Add Agriform™ slow release fertilizer tablets evenly spaced alongside root ball. Finish backfilling hole. Compact soil firmly as you backfill making sure no air pockets exist. Berm/mound exposed sides of root ball with soil left over from digging the hole. (See illustration.) Create a 2-4 inch high rimmed watering basin around the root ball of the plant. Fill with water-several times using B-1 mixed in water.
- Place a 2-3 inch layer of decorative bark or stone mulch around the plant, keeping it 6 inches away from trunk/stem. Mulch will help keep soil moist, cool and control weeds. We do not recommend the use of black sheet plastic as a weed barrier around plants as it promotes disease and ‘sours’ the soil. We have a porous weed barrier material that lets the soil absorb oxygen and water.
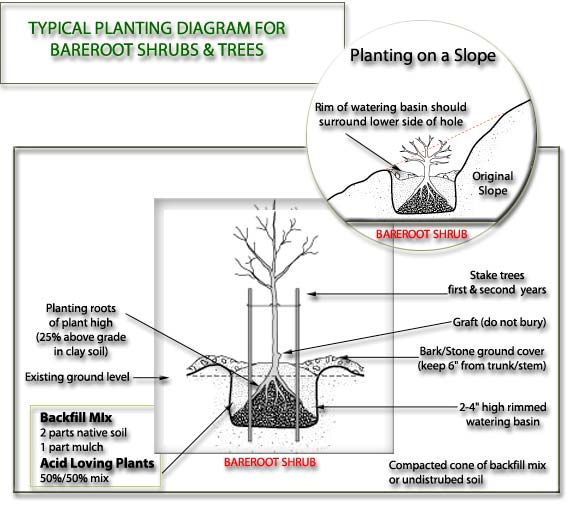
Bare-root Shrubs and Trees
Pre-planting
Did you select a proper site for the requirements of the plant?
Plant bare root plants within 2 days of taking them home. If your bare root plant cannot be installed the same day it is taken home maintain in an area out of direct sun and protected from freezing — like a garage. Keep roots in plastic bag if present or heel in the ground at a temporary location. Keep roots covered and moist at all times!. Shredded, wet newspaper works if mulch is not available. Before planting, soak roots in a trash can or bucket filled with water for 30 –60 minutes or heavily saturate root-zone with water after planting.
Do not bury the graft (if present) or any part of the trunk — plant high
Optional: Add Root Master B-1™ that contains Naphthalene Acetic Acid to water to stimulate new root growth.
Planting
- Dig a hole deeper than the height of the root system and at least twice as wide. Make a firm cone of soil mix in the hole. This allows the root-zone soil to be slightly higher than existing ground level (see illustration). Spread roots down over cone positioning plant at a depth to keep the graft, if present, 2-4 inches above final grade. The soil around the plant roots should be at least 1-2 inches higher than surrounding ground level and as &much as 25% higher in clay soil to allow for improved root-zone drainage.
- Backfill halfway with a mix of 2 parts soil native to the site to 1 part soil amendment mixed thoroughly together. Use our general purpose Black Forest™ Redwood Based Soil Conditioner. For a richer pre-fertilized soil conditioner use Crop™. For Rhododendrons, Azaleas, Camellias, Blueberry, etc. use a low pH product like our Acid Planting Mix™. Do not use house-plant potting mix.
- Check again that the plant is sitting straight and slightly higher than ground level and that the trunk will not be buried. Add Agriform™ slow release fertilizer tablets evenly spaced alongside root ball. Finish backfilling hole. Compact soil firmly as you backfill making sure no air pockets exist. Create a 2-4 inch high rimmed watering basin around the root area of the plant. Slope the outsides of the watering basin down from the raised planting area to existing grade (see illustration). Fill with water-several times using B-1 mixed in water
- Place a 2-3 inch layer of bark or stone ground cover mulch around the plant, keeping it 6 inches away from trunk/stem. Mulch will help keep soil moist, cool and control weeds. We do not recommend the use of black sheet plastic as a weed barrier around plants as it promotes disease and ‘sours’ the soil. We have a porous weed barrier material that lets the soil absorb oxygen and water.
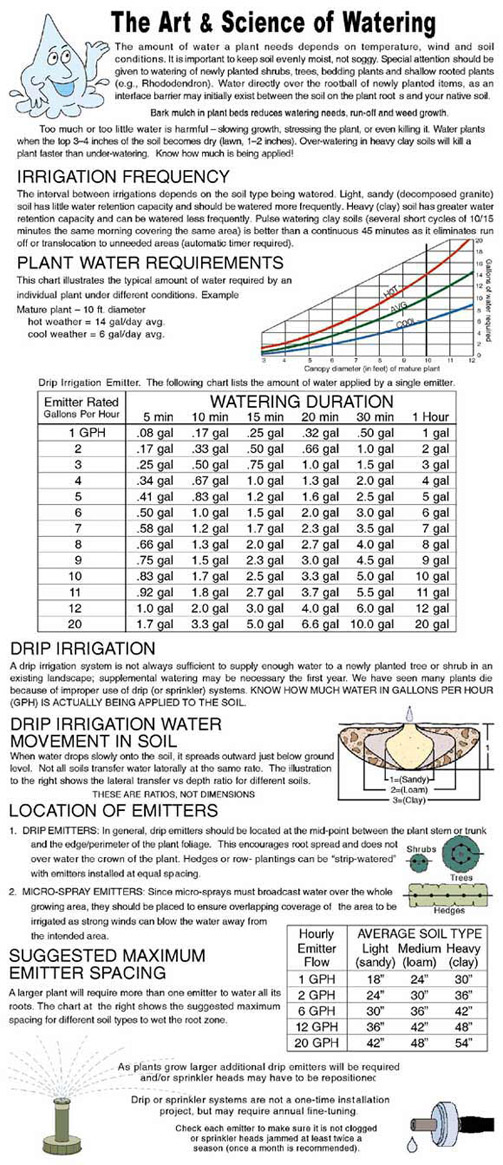
Watering